Posted by Spycor Building on Apr 16th 2025

Are you searching for the ultimate DELTA®-VENT S installation guide? Whether you're a contractor, builder, or homeowner, this comprehensive walkthrough covers everything you need to know about how to install DELTA VENT S air barrier properly. Learn the best practices, tools, and techniques for applying this premium vapor permeable membrane and water-resistive barrier to ensure long-term building protection and superior performance.
This guide offers clear DELTA VENT S wall membrane installation steps, including surface preparation, fastening methods, and sealing details to create a durable air water vapor barrier. Whether you’re working on a residential or DELTA VENT S commercial wall wrap application, these proven methods will help you achieve a high-performance envelope that resists moisture intrusion while allowing vapor to escape.
Safety First: Health & Safety Guidelines
Before starting your DELTA VENT S wall membrane installation, it's crucial to prioritize safety on the job site. Proper safety measures ensure a smooth and efficient installation while minimizing the risk of accidents. To protect yourself and your team, make sure to use the following personal protective equipment (PPE):
- Hard hat: Essential for head protection, especially in areas where overhead work or falling objects are a concern.
- Safety boots: Sturdy, slip-resistant boots will protect your feet from sharp objects, heavy materials, and other potential hazards.
- Gloves: Wear durable gloves to shield your hands from cuts, abrasions, and exposure to materials that may irritate your skin.
- Safety glasses: Protect your eyes from debris, dust, and any particles that may fly up during installation.
- Fall arrest equipment: If working at heights, always use appropriate fall protection systems such as harnesses, lanyards, and guardrails to prevent falls.
In addition to wearing the proper safety gear, always follow OSHA or local safety regulations to ensure your team's well-being. Refer to the Safety Data Sheets (SDS) for all components used in the installation, including Dorken DELTA VENT S and any associated materials, to understand potential hazards, handling procedures, and emergency measures.
Required Materials & Tools
To complete the DELTA VENT S commercial wall wrap application, gather the following materials:
Recommended Materials:
- DELTA®-VENT S
- DELTA®-FAS CORNER (pre-fabricated window corners)
- DELTA®-FLEXX BAND (flexible flashing)
- DELTA®-MULTI BAND (tape for air sealing)
- DELTA®-FLASHING
- DELTA®-TILAXX or DELTA®-LFS (sealants)
Recommended Tools:
- Utility knife
- Measuring tape
- Caulking gun
- Hammer or staple gun
- Cordless drill (for steel studs)
- Hand roller
Step-by-Step DELTA VENT S Installation Instructions
Step 1 Installation
■ Cut DELTA®-VENT S into manageable length. DELTA®-VENT S can be installed vertically or horizontally.
■ Starting at a corner of the building, unroll DELTA®-VENT S, keeping the roll plumb.
■ Extend approximately 12” (300 mm) past either the inside or outside corner of the wall.
■ At end and side laps, overlap DELTA®-VENT S by minimum of 6” (150 mm).
■ To ensure air barrier continuity, tape any laps with DELTA®-MULTI BAND tape.
■ Always begin the installation of DELTA®-VENT S at the bottom of the building to ensure proper downward shingling of the laps.
■ Secure DELTA®-VENT S by fastening into the studs (wherever possible) no closer than 6” (300 mm) and no wider than 16” (406 mm) on centre horizontally and vertically.
■ Ensure that the DELTA®-VENT S is pressed tightly into all inside corners before fastening to prevent damage during the installation of exterior cladding.
Step 2 Wall/foundation transition
■ DELTA®-VENT S should overlap through-wall (DELTA®-TW) flashing by minimum of 6” (150 mm).
■ For optimum performance:
- Seal DELTA®-VENT S to through-wall (DELTA®-TW) flashing with DELTA®-TILAXX or DELTA®-LFS or
DELTA®-MULTI BAND.
■ If no through-wall flashing is installed, the bottom edge of DELTA®-VENT S should extend beyond the sill plate by at least 2” (50 mm) and be sealed with DELTA®-TILAXX or DELTA®-LFS.
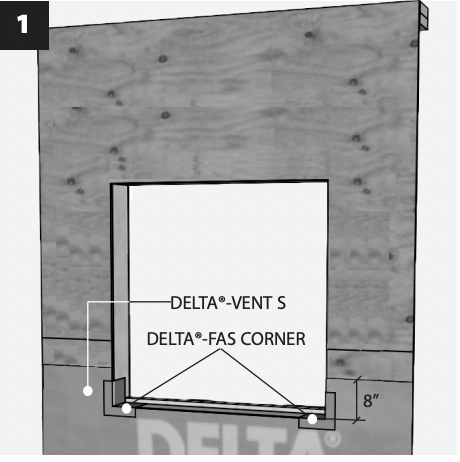
Step 3 Window
■ Install DELTA®-VENT S membrane below window with cut out miniumum 8” (200 mm) above sill. Install DELTA®-FAS CORNERS in lower corners of rough opening. Staple on vertical leg for temporary support (see Detail 1).
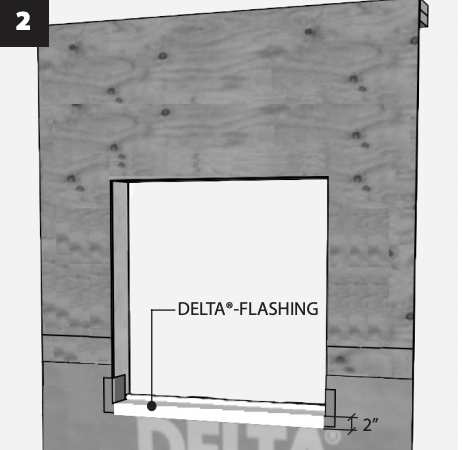
■ Install DELTA®-FLASHING membrane onto window sill. Overlap 2” (50 mm) onto face of DELTA®-VENT S membrane below (see Detail 2).
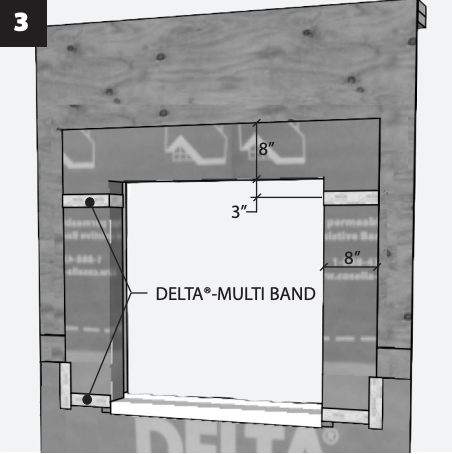
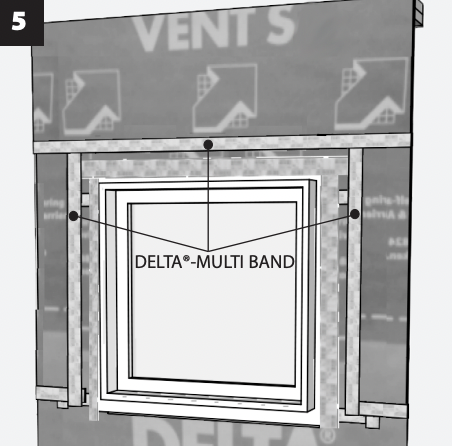
■ Install DELTA®-VENT S membrane strip to wrap jamb. Lap 8” (200 mm) onto face of wall at jamb, minimum 3” (75 mm) at head. Install DELTA®-VENT S membrane at window head or rough opening. Lap minimum 8” (200 mm) onto face of wall at head overlapping window jamb by minimum 3” (75 mm). Install DELTA®-MULTI BAND tape at overlapped edges of DELTA®-VENT S to ensure airtightness (see Detail 3).
■ Install window shims in accordance with window manufacturer’s specifications, typically at quarter points of rough opening and under setting block locations for window. Install window in accordance with manufacturer’s specifications. Generally, the gap between window and rough opening should be around 1/2” (12 mm).
■ From interior, install backer rod around the full perimeter of window. Install DELTA®- TILAXX or DELTA®-LFS sealant around perimeter of window alternate air sealing detail; Apply low expansion spray foam around full perimeter of window. Do not seal full cavity to allow drainage from sill flashing.
Rebate window
■ For exposed buildings and buildings taller than 2 stories, apply an exterior bead of sealant between window frame and membrane at jambs and head only.
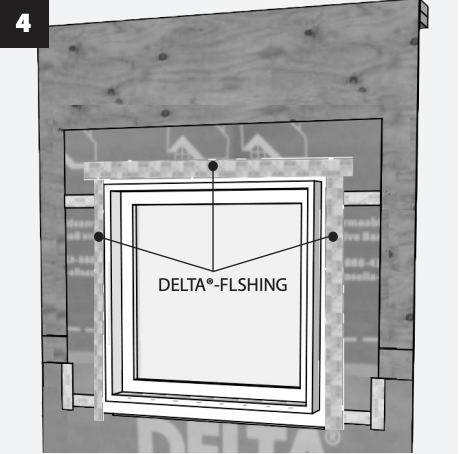
Step 4 Installation of membrane
■ Install DELTA®-VENT S membrane overlapping the membrane at window flange and head minimum 6” (150 mm). For optimum performance, tape vertical and horizontal laps with DELTA®-MULTI BAND tape (see Detail 5).
■ Install kick-out flashing over the window head. Seal any penetrations with DELTA®- MULTI BAND tape (see Detail 6).
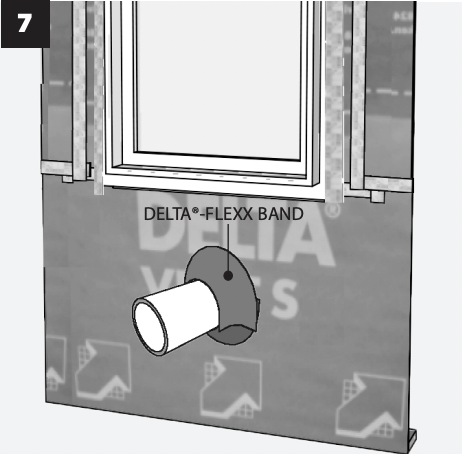
Step 5 Penetrations
■ Cut DELTA®-VENT S around penetrations as tightly as possible.
■ Seal gaps between penetration and substrate with DELTA®-TILAXX sealant.
■ Install DELTA®-FLEXX BAND around the penetration (see Detail 7).

Step 6 Inspection
■ Inspect the DELTA®-VENT S for rips, tears, or other installation deficiencies in the continuity. Tape rips, tears or holes smaller than 2” (50 mm) with DELTA®-MULTI BAND.
■ For holes greater than 2” (50 mm), a patch is required.
■ Cut a slit approximately 3” (8 cm) above the hole and approximetley 3” (8 cm) wider than the hole.
■ Cut a patch minimum 6” (150 mm) larger than the hole.
■ Slide the top edge up into the cust slit so that the patch covers the hole.
■ Tape the patch with DELTA®-MULTI BAND in the following order:
1. Bottom
2. Sides
3. Top
■ Ensure all materials are installed as required.
Step 7
■ Clean up all excess materials and dispose of properly
Installation Best Practices
To ensure a seamless and effective installation, it’s crucial to follow the best practices for DELTA®-VENT S:
- Ensure DELTA®-VENT S is installed on a clean, dry, and smooth substrate: Before starting the installation, inspect the surface to make sure it is free from dust, dirt, moisture, and other contaminants that could affect the adhesion and overall performance of the membrane. A smooth surface will also help prevent wrinkles or stretching of the material during installation.
- Avoid installing in high winds or rainy weather: Installing DELTA®-VENT S in high winds can make it difficult to handle and secure the membrane, potentially leading to improper application or damage. Rainy conditions can also interfere with the membrane’s ability to bond properly, compromising its effectiveness as an air and moisture barrier. Aim to install the membrane during dry, calm weather for the best results.
- Do not use incompatible products: It’s important to avoid using products that could negatively affect the membrane's performance, such as surfactant-laden sealants or asphalt-based materials. These substances can damage the membrane and interfere with its moisture and air-resistive properties. Always check the compatibility of products before use.
- Protect the membrane from prolonged UV exposure: DELTA®-VENT S is designed to be durable, but prolonged exposure to UV rays can degrade the material. To protect the membrane, ensure that cladding is installed promptly after the membrane application. This will shield the membrane from UV rays and ensure long-lasting performance.
Building Code Compliance
DELTA®-VENT S meets the requirements of the International Residential Code (IRC), International Building Code (IBC), and National Building Code (NBC) for air and water-resistive barriers, ensuring that your installation complies with the latest building regulations.
When it comes to choosing a vapor permeable, water-resistive air barrier, DELTA®-VENT S stands out for its exceptional performance and durability. By following this comprehensive DELTA VENT S installation guide, you can be confident that your project will meet the highest standards of air and moisture management, providing long-term protection for the building.
Need help choosing the right components for your project?
CLICK HERE to shop for DELTA®-VENT S and all compatible accessories, including flashing, tapes, and seals. If you have any questions or need expert guidance, don’t hesitate to contact our team. Our knowledgeable staff is always ready to provide support, ensuring that your installation is a success.