Posted by Spycor Building on Apr 14th 2025
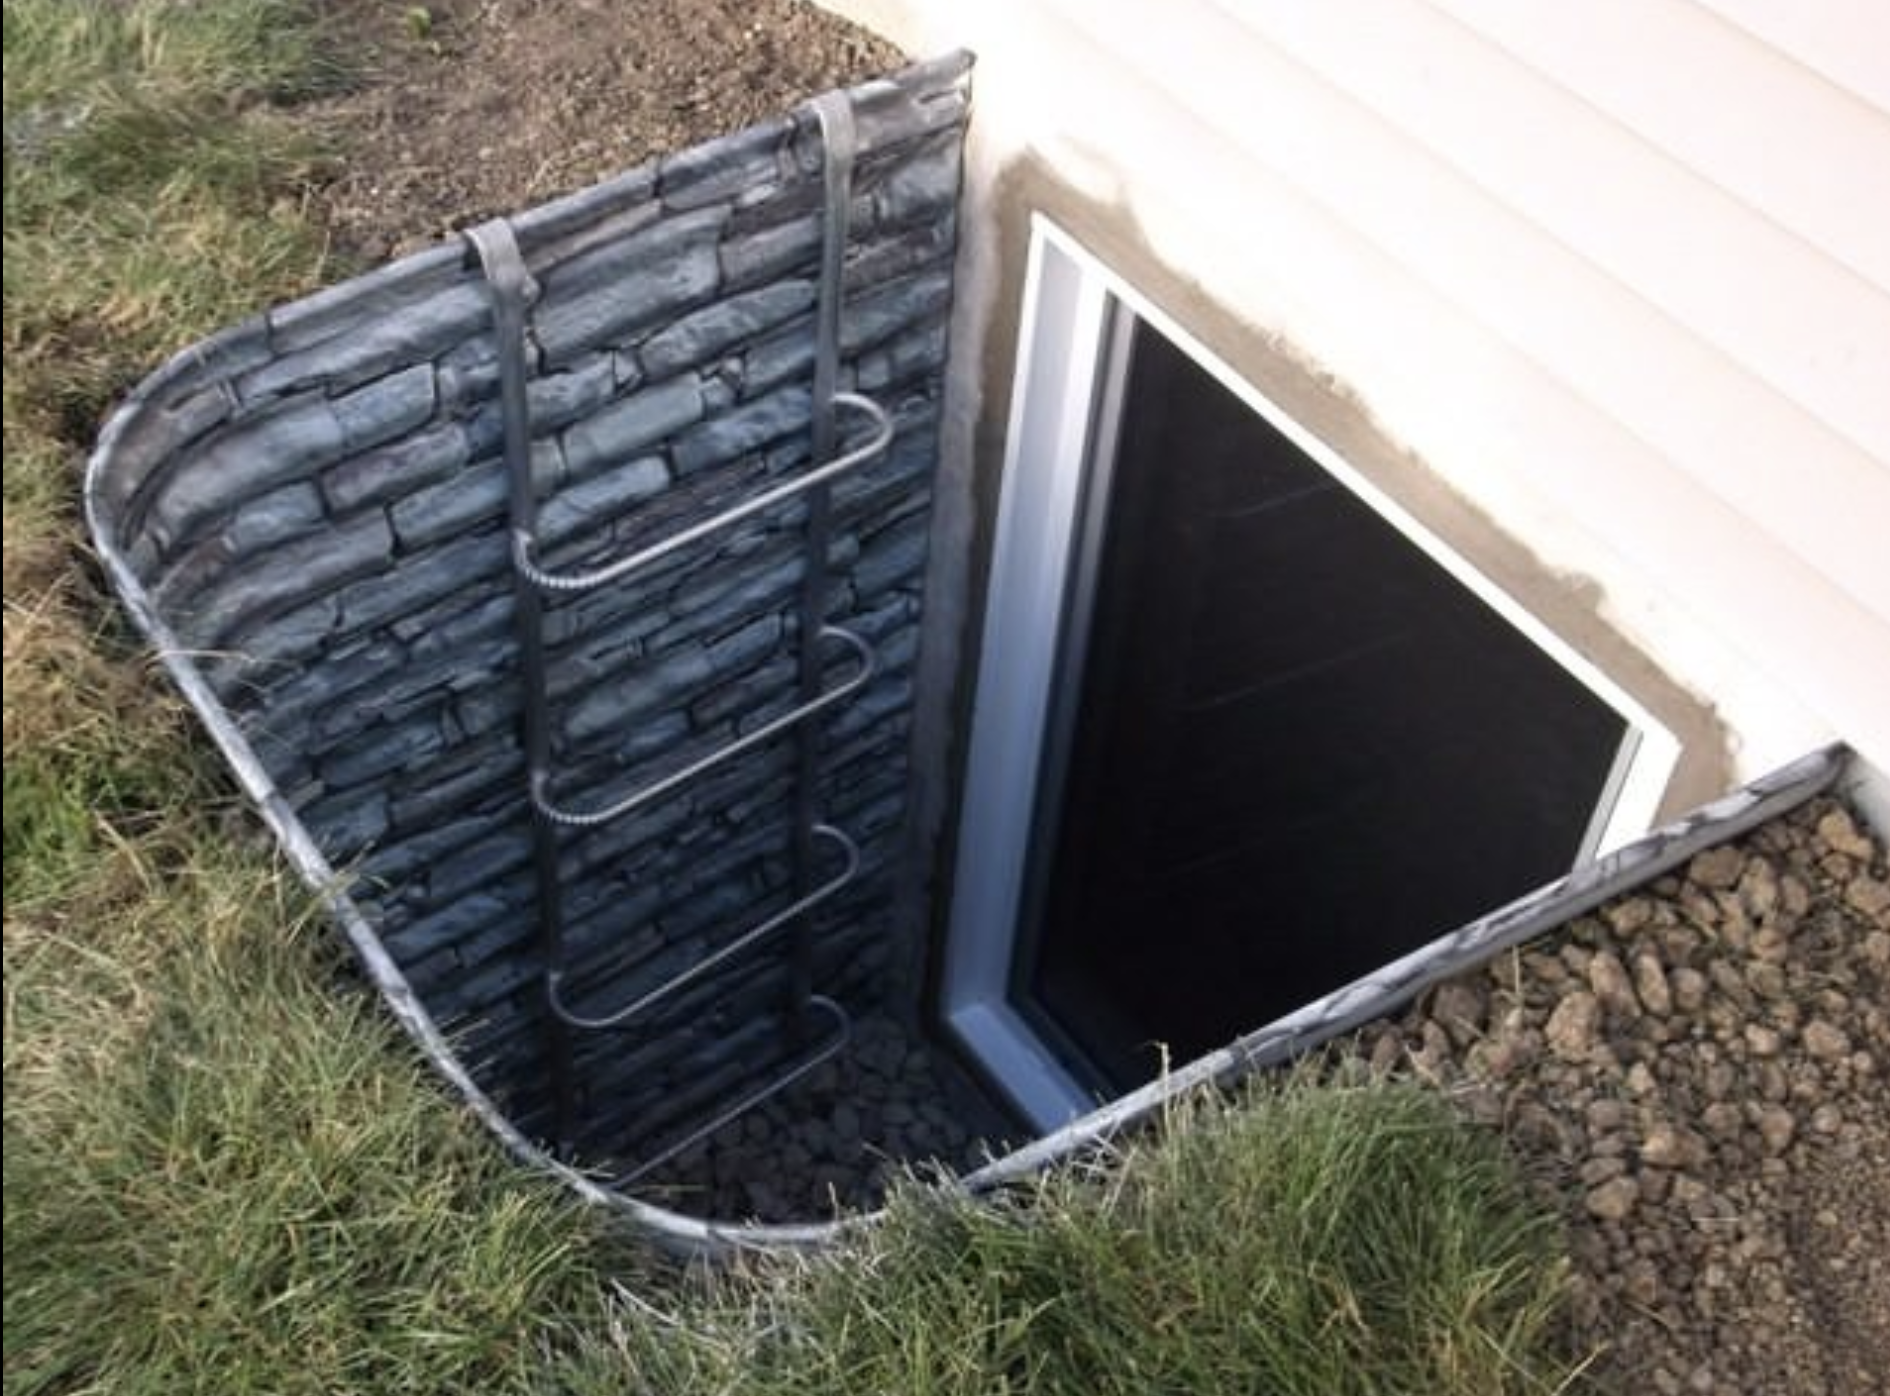
Looking to enhance your basement's safety and natural light with a beautiful, code-compliant egress system? The Stonewell Escape Egress Well by Mar-flex is one of the best egress window wells on the market—blending rugged performance with an elegant stone finish. Whether you’re a homeowner or contractor, proper installation is key to maximizing safety, drainage, and long-term durability.
In this guide, we’ll walk you through how to install a Stonewell Escape Egress Well, step by step.
Why Choose the Stonewell Escape Egress Well?
Before we dive into installation, here's why this egress window well stands out:
- Meets international residential code (IRC) egress standards
- Durable, maintenance-free polyethylene build
- Gorgeous real-stone look in sandstone or granite
- Pre-assembled for fast and easy installation
- Built-in steps for safe escape
- Compatible with window openings up to 5 feet wide
This makes it ideal for homeowners wanting both beauty and functionality—and contractors needing to meet strict building codes.
Tools & Materials You'll Need:
- Shovel or mini-excavator
- 3/8" x 2¾" wedge anchors or Tapcon screws
- Fender washers
- Level and measuring tape
- Fine granular sand and topsoil
- Pea stone or free-draining rock
- Optional: 6" capped drain pipe, shoring boards
Step-by-Step Installation Guide
1. Review Local Building Codes
Always check your local regulations for egress window well requirements before beginning installation. Building codes vary by city and state, and understanding these rules helps ensure your project is both safe and code-compliant.
Failing to meet local egress standards could delay your home inspection or result in costly corrections. Most jurisdictions require that egress wells provide a minimum clearance, proper ladder access, and an escape route that can be used without keys or tools.
2. Locate Underground Utilities
Before you begin excavation, it’s crucial to call before you dig. Contact your local utility locator service to identify any underground utilities, such as electric lines, gas pipes, water lines, or sprinkler systems. Striking a utility line can lead to dangerous accidents, service outages, or costly repairs.
Mark all utility lines clearly using spray paint or flags to avoid them during installation. This step protects not only your property but also the integrity of the Stonewell Escape egress well installation process.
3. Excavation
Begin by digging a space that is centered on your basement window opening, allowing for enough clearance to safely work and properly position the Stonewell Escape Egress Well. Be sure the dimensions give room not just for the well itself, but also for any drainage components and mounting tools.
Effective drainage is one of the most important parts of a successful egress window well installation. Without it, your basement could be at risk of flooding or water seepage.
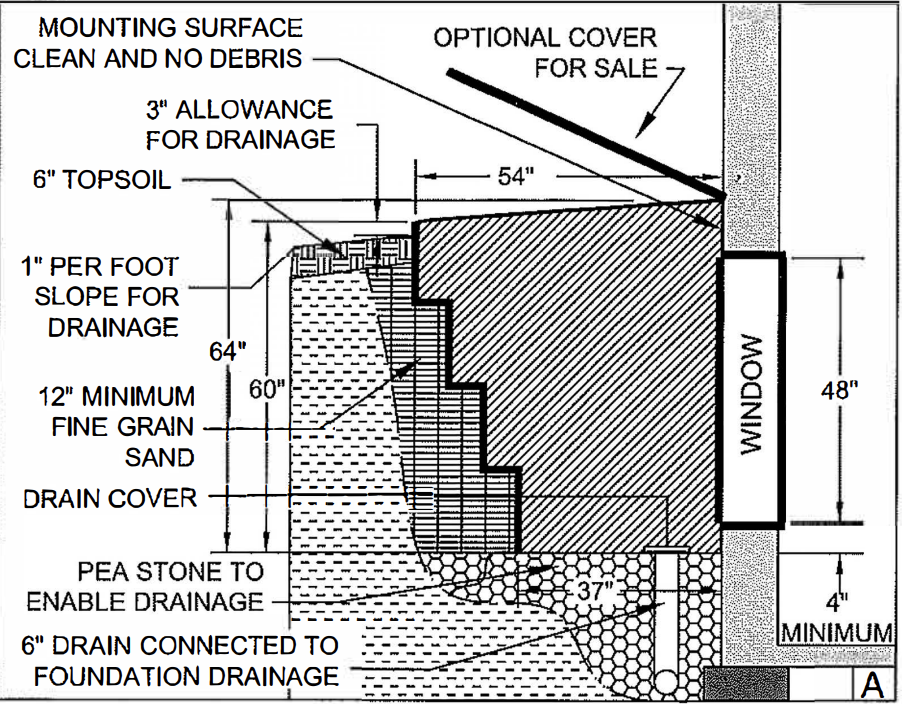
- If you have a perimeter drain system: Connect a 6-inch capped pipe extension from the perimeter drain line up to the base of the egress well. This allows water to exit the well and tie directly into your home’s existing drainage system.
- If no drainage system exists: Excavate down to the top of the home’s foundation footing and fill the base with pea gravel or clean, free-draining rock. This creates a natural drainage solution to move water away from the base of the well.
Once your well is positioned and drainage is set:
- Always slope the surrounding soil away from the egress well in all directions. This prevents rainwater and surface runoff from pooling near the structure.
- Be sure to redirect roof downspouts and sump pump discharge lines away from the well. Water runoff from gutters is a major cause of basement flooding and structural damage near window wells.
Pro Tip: Use landscape grading and extensions on your downspouts to keep all water flow safely away from your egress system.
4. Mounting the Egress Well
Once the excavation and drainage setup are complete, it’s time to mount your Stonewell Escape Egress Well securely to your foundation.
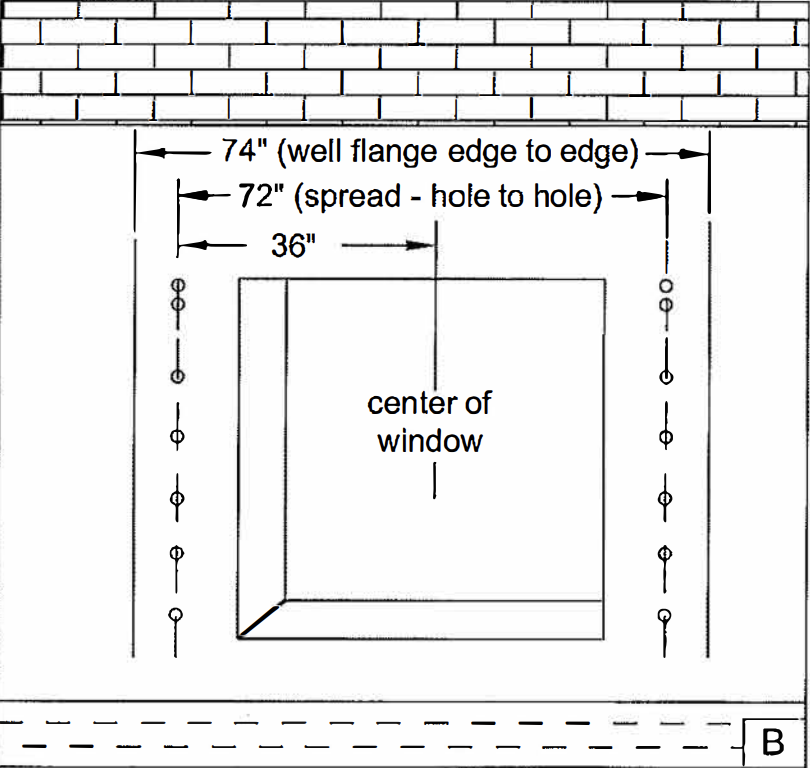
Start by marking two vertical lines on each side of your basement window. Follow the manufacturer’s flange placement guide carefully—this step ensures the egress well is properly aligned with the window and positioned at the right height for safe use and code compliance.
Position the well so that the flanges sit perfectly within your marked vertical lines. Double-check the placement before drilling.
Next:
- Use a power drill to create holes in the foundation wall through the pre-formed holes on the well flanges.
- Secure the well using 3/8" x 2¾" wedge anchors or Tapcon screws, along with fender washers. (Hardware not included with the well.)
Always start anchoring from the top of the flange and work your way down. This ensures even pressure and a tight, flush fit against the foundation.
Pro Tip: Because the egress well walls are slightly flexible, you may want to use temporary internal shoring to hold the shape during the backfill process. This prevents warping and helps the well maintain its structure until final grading is done.
5. Backfill & Final Drainage
With the egress well securely mounted, the next critical step is backfilling the area properly to maintain structural integrity and ensure long-term drainage performance.
Begin backfilling by hand using very fine sand or equivalent granular material. Start at the farthest point from the foundation wall and work your way inward. This technique provides even support around the well while preventing pressure points or distortion. Avoid using large rocks or heavy debris that could shift or damage the well. This step helps the Stonewell Escape Egress Well maintain its shape and allows moisture to flow naturally away from the foundation.
Once the well is mostly filled:
- The top 6 inches of the backfilled area can be finished with topsoil, making it easy to landscape around the well and blend it into your yard.
- Be careful not to compact the soil too tightly, which could disrupt the drainage layer underneath.
Just like during excavation, it’s essential to grade the surrounding soil so it slopes away from the well in all directions. Proper grading ensures rainwater, snowmelt, and other runoff move away from your foundation, preventing moisture problems and erosion.
Tip: After major storms or snow melts, do a quick check around your window well to ensure the grading hasn’t shifted or settled.
6. Add a Safety Cover
Once your egress well is fully installed and backfilled, the final step is to install a safety cover—a critical component for both safety and long-term durability.
We strongly recommend using a Mar-flex approved egress window well cover, specifically designed to fit the Stonewell Escape Egress Well.
Adding a cover isn’t just a finishing touch—it’s an essential safeguard that offers multiple benefits:
- Prevents Accidental Falls
Covers help protect children, pets, and unsuspecting adults from accidentally stepping or falling into the well. - Blocks Leaves, Trash, and Debris
A tight-fitting cover keeps your well clean and functional by blocking dirt, leaves, and other debris that could clog drainage or create maintenance issues. - Shields Against Harsh Weather
Covers provide added protection from rain, snow, and ice buildup—extending the life of your egress system and reducing maintenance.
Never leave an egress well uncovered. It’s a risk to both safety and performance.
Ready to Install Yours?
Whether you're remodeling your basement or working on a new construction project, the Stonewell Escape Egress Well offers the durability, safety, and sleek design that today’s homeowners and contractors demand.
This system doesn’t just meet code—it enhances your space with peace of mind, performance, and curb appeal.
CLICK HERE to check the best Stonewell Egress Well for your needs
Get yours today from SpycorBuilding.com—your trusted source for egress window wells, foundation drainage systems, and professional-grade waterproofing products.
Let your basement breathe with safety and style.